
Thursday, December 12, 2013
Holiday Bazaar
Today my husband and I sold honey and candles at the annual Holiday Bazaar at my work. There was an amazing turnout, I nearly sold out of all of my 2013 honey! I do have a few jars left for anyone who is interested ;)

Tuesday, December 10, 2013
Freezing
BRRR! It has been extremely cold lately. Last year we had some cold snaps that finished off one of my hives in January. I'm a bit worried that this cold snap is going to freeze my weaker hives. Earlier this week it dropped to the high 20s, last night the temperature dropped to 30 degrees F. The water bucket I leave out for the bees was frozen. Mum dumped out the water for me and freshened it, here are the little sticks that I keep in the water to provide life rafts for the bees, frozen solid!
.JPG)
Luckily, there was activity in front of all three hives later in the day as it hit a high of 52 (even the weakest yellow hive):
.JPG)
.JPG)
Luckily, there was activity in front of all three hives later in the day as it hit a high of 52 (even the weakest yellow hive):
.JPG)
Sunday, October 20, 2013
Last Minute Checking
This is probably the last chance I'm going to get to check in on the bees this season. It's probably going to start getting chilly, it's barely reaching the mid 60s in the afternoon. If it gets much colder, it would be risky to open the hives.
I wanted to checkin on the yellow hive after my robbing disaster last month. Looks like the queen is still alive and well! I can't believe I found her again, I can rarely spot my unmarked queens. I usually have to look for other evidence that they are well (looking for eggs and young larve). Here is the yellow hive queen:

Though I found the queen, I also saw that the yellow hive has nearly cleared out their honey stash already! Rather than bringing in nectar, they seem to have just been eating the frames of honey I gave them last month. I was able to clear out 10 empty frames and reduce the hive to only two hive bodies. I also put on a feeder to try to help them through the winter... it's not looking good for this hive.
Even though the bees don't seem to be bringing in much nectar, there is certainly a lot of pollen is still coming in, check out this great shot of the bees carrying pollen:

While checking in on the hives, I found this ridiculous frame of honey! I must have forgotten to put foundation on a frame next to this one, because the bees just kept building it up. I have no idea how I'm going to harvest this:

Sunday, September 15, 2013
Cleaning Wax
Cleaning wax is not my favorite thing. I get a lot of wax through the honey harvesting process, not to mention knocking out any burr comb. Usually I leave it honey soaked until I am ready to melt it down. This time I tried washing my wax straight away. I filled up my uncapping tub with water and sloshed around the wax until it was clean.


I strained out the water using my coarse filter, it looks pretty nice:

This will be a lot easier to melt down and filter to make some nice candles later :)
The bees were VERY curious what I was up to while I was doing this. It was really hard to clean my honey soaked equipment out in the front yard like I usually do. Last year, I harvested honey around the same time and everything worked out fine. This year there must be a lot less in bloom because I got mobbed by bees as I was cleaning. Towards the end, I even had to put on my bee suit. The bees are typically very calm and I'm not as cautious while cleaning, but when there is very little nectar, the bees tend to get grouchy and protective. Better safe than stung.
Saturday, September 14, 2013
Honey Harvest, Fall Cleanup, and Robbing
We had an excellent honey harvest over the weekend! We had some friends come down to help us out, the "purple" hive was getting quite tall. It's hard to even call it the purple hive anymore since I've had to scavenge boxes from the other hives just to keep up with their honey production!

Overall we harvested about 20 frames of honey, which turned out to be 44 pounds. I bottled 60 jars of honey (6oz each) leaving roughly 20 pounds to a friend of mine to brew mead (which has been turning out very well!).
I also took this opportunity to do a bit of fall cleanup. I have had quite a bit of crystallized honey hanging around in some of my frames since last season. The bees don't seem to have touched it over the summer, and I can't get it out of the comb to harvest it. So I knocked out several of the crystallized honey frames (below):

I also cleared out some of the "wild comb" from the new yellow hive. They've got a bunch of odd looking frames because I gathered the colony from a fence, cutting out pieces of comb and putting it into frames. The yellow hive seems to not have enough nectar coming in, because they cleaned out those combs and have left them empty. I'm taking the opportunity to knock out their strange pattern, I'll melt down the wax to use it later:

Since the yellow hive seems to be eating up all of their honey stores already, I put a full medium super of honey on their hive. Unfortunately I didn't seal up the top of the hive properly... So the stronger green and purple hives immediately went into attack mode and started robbing the honey from them. Luckily I my mistake within an hour and was able to close the hive and put an entrance reducer on (so that the yellow hive could defend their home a little better). Hopefully I caught this robbing soon enough, but there were definitely dead bees all around the hive. I hope I didn't kill my already struggling hive...
Wednesday, September 11, 2013
Harvest Preparation
After my poor experience using "Honey Bandit" during the last honey harvest, I decided to prepare for my next honey harvest using the bee escapes. The downside of using the bee escapes is that you have to put them on the hive a few days before harvesting. Luckily my little brother was in town to help me out:

I also wanted to check in on the yellow hive to see that they were getting settled in. I wasn't sure that the queen actually survived the move from the fence into the hive. Since the hive is so small, we actually found her on a frame! Isn't she pretty:

The queen made it, but the yellow hive is desperately low on honey and nectar. Since I caught them late in the season when less is blooming, they've had less of a chance to gather food. They probably need most of the worker bees to keep the brood warm and tend to the queen, leaving few bees to forage... I'll have to give them some honey from one of the other hives to try to boost their strength before winter.
Sunday, June 30, 2013
Stragglers
The bees that we moved off of the fence the other day seem to like their new hive, they don't seem to want to return to the fence. However not ALL of the bees made the move. There is about a grapefruit sized cluster of bees that refuses to leave the fence! I think I finally got them today though (after many failed attempts).
Attempt 1: Leave the hive near the site of the wild hive so that the bees in the old location can smell the bees in the new location. In hind site, I should have left the hive close to the wild hive site a little longer, I only left the hive near the old location for 18 hours. I've heard that the bees could take up to 2 days to relocate.
Here is what the bees looked like on Thursday afternoon, the day after we removed the hive from the fence and after my "attempt 1" at picking up the stragglers:


Attempt 2: brush the bees off the fence to try to clean away residual wax. The wax holds the smell that the bees are attracted to, by removing it, the bees may just leave. I think the "brushing" part of this attempt really only riled the bees up and didn't really encourage them to leave at all. I wasn't able to clean too much wax off of the fence either.
Attempt 3: Cover the area of the fence with the wax until the bees leave, then clean the wax off. I don't think my covering was properly attached to the fence, so the bees wiggled underneath.
Four days after the initial removal of the hive from the fence, the number of stragglers didn't seem to dwindle too much. If anything, they sort of just moved upwards into the vine plant, the bees on the ground also remained:

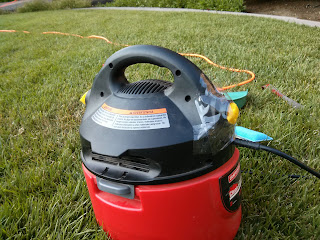
Attempt 4: Homemade bee vacuum! Okay, there is such thing as a vacuum that you use on bees. It's expensive. There are a bunch of forums that show you how to make your own out of a shop vac. Here is my attempt using a 2 gallon wet/dry vac. It seems like the main takeaway is, cover the filter and the exhaust. I covered the center cylinder containing the float ball with a towel, then put the filter on top and secured everything with a rubber band. I stuffed a kitchen sponge into the exhaust (yes, I know, very scientific procedure here):

Assembled, my beevac looks like this:

I had another sponge to use after I was done vacuuming - you remove the hose then stuff the sponge in the hole so the bees don't escape. I tested out my contraption on two "dummy bees" first (little balls of crumpled paper), the suction power was much diminished, but it still sucked them up. When I tried it out on the actual bees, it wasn't strong enough. When I was right on top of the bees, it really only lifted them off the fence a little, but their feet stayed on the fence. I found an airier sponge to use, and that increased the suction enough to remove the bees from the fence. I had to hold the hose right on top of the bee - so it was still a very weak pull so as not to harm the bees. Here is my modified contraption with a yellow sponge:
I tried this out on about 20 test subjects, then opened the container. They made it! They were a little confused, and dusty because I didn't do a great job cleaning out the shop vac, but they seem to be alive and healthy. I vacuumed up the rest of the bees right around dusk, I chose dusk so that the foraging bees would return and land on the fence - this will maximize the number of bees I can vacuum up and move off of the fence. I did this in two passes, first I vacuumed up the bees on the fence. There were still a bunch of airborne bees after that, but I was at least able to scrape all of the wax off of the fence now. I also dowsed the fence in Honey Bandit (an all natural bee repellent, it does no harm to the bees. I've used it for harvesting honey before, but this seemed like another good opportunity to use it). The airborne bees wouldn't land on the fence after I sprayed the Honey Bandit there, so they clustered on the ground as it started to get a little darker. When there were no more bees in the air, I vacuumed up the little cluster of bees on the ground. I managed to get every single bee off of the ground and off of the fence! YES! Finally some progress.

Right as it was starting to get dark, I opened the beevac and placed it right next to the opening of the hive. In the morning as the bees warm up, I hope they just go into the hive rather than return to the fence:

Attempt 1: Leave the hive near the site of the wild hive so that the bees in the old location can smell the bees in the new location. In hind site, I should have left the hive close to the wild hive site a little longer, I only left the hive near the old location for 18 hours. I've heard that the bees could take up to 2 days to relocate.
Here is what the bees looked like on Thursday afternoon, the day after we removed the hive from the fence and after my "attempt 1" at picking up the stragglers:

There was also a small cluster on the ground:

Attempt 2: brush the bees off the fence to try to clean away residual wax. The wax holds the smell that the bees are attracted to, by removing it, the bees may just leave. I think the "brushing" part of this attempt really only riled the bees up and didn't really encourage them to leave at all. I wasn't able to clean too much wax off of the fence either.
Attempt 3: Cover the area of the fence with the wax until the bees leave, then clean the wax off. I don't think my covering was properly attached to the fence, so the bees wiggled underneath.
Four days after the initial removal of the hive from the fence, the number of stragglers didn't seem to dwindle too much. If anything, they sort of just moved upwards into the vine plant, the bees on the ground also remained:

Attempt 4: Homemade bee vacuum! Okay, there is such thing as a vacuum that you use on bees. It's expensive. There are a bunch of forums that show you how to make your own out of a shop vac. Here is my attempt using a 2 gallon wet/dry vac. It seems like the main takeaway is, cover the filter and the exhaust. I covered the center cylinder containing the float ball with a towel, then put the filter on top and secured everything with a rubber band. I stuffed a kitchen sponge into the exhaust (yes, I know, very scientific procedure here):

Assembled, my beevac looks like this:

I had another sponge to use after I was done vacuuming - you remove the hose then stuff the sponge in the hole so the bees don't escape. I tested out my contraption on two "dummy bees" first (little balls of crumpled paper), the suction power was much diminished, but it still sucked them up. When I tried it out on the actual bees, it wasn't strong enough. When I was right on top of the bees, it really only lifted them off the fence a little, but their feet stayed on the fence. I found an airier sponge to use, and that increased the suction enough to remove the bees from the fence. I had to hold the hose right on top of the bee - so it was still a very weak pull so as not to harm the bees. Here is my modified contraption with a yellow sponge:

I tried this out on about 20 test subjects, then opened the container. They made it! They were a little confused, and dusty because I didn't do a great job cleaning out the shop vac, but they seem to be alive and healthy. I vacuumed up the rest of the bees right around dusk, I chose dusk so that the foraging bees would return and land on the fence - this will maximize the number of bees I can vacuum up and move off of the fence. I did this in two passes, first I vacuumed up the bees on the fence. There were still a bunch of airborne bees after that, but I was at least able to scrape all of the wax off of the fence now. I also dowsed the fence in Honey Bandit (an all natural bee repellent, it does no harm to the bees. I've used it for harvesting honey before, but this seemed like another good opportunity to use it). The airborne bees wouldn't land on the fence after I sprayed the Honey Bandit there, so they clustered on the ground as it started to get a little darker. When there were no more bees in the air, I vacuumed up the little cluster of bees on the ground. I managed to get every single bee off of the ground and off of the fence! YES! Finally some progress.

Right as it was starting to get dark, I opened the beevac and placed it right next to the opening of the hive. In the morning as the bees warm up, I hope they just go into the hive rather than return to the fence:

Wednesday, June 26, 2013
Collecting the Wild Hive
I sent out an email to the San Mateo Beekeepers Guild to see if I could borrow some equipment and get some help putting the wild hive on the back fence into a wooden beehive. Thanks to Vicky for letting me borrow some of the hive components I was missing, and extra special amazing thanks to Art for helping me get the bees into their new home!
I had no idea how to get the bees off the fence into a hive, so Art was a great help. Here's how we did it:
So our plan A was to prune the bush they were hiding behind, then carefully take the comb off the fence and put it into frames. So we started out pruning the bush, the bees were extremely calm and manageable, we didn't even need to use gloves or veils:

Here is the full size of the hive once everything was trimmed. It's probably about 1 and a half feet tall and almost a foot deep as well. Looks like they have definitely been living here for about a month. We put a tarp down to catch any bees that fell:

Great! Plan A is going so well! Wait... I spoke too soon. We only had the hive fully exposed long enough to put up the tarp and snap that last picture. Then this happened:

Not sure what that is? The entire hive fell off of the fence at once. When it hit the ground, bees flew everywhere. It was literally an explosion of bees. It probably happened for a few reasons, the hive was probably partially supported by all those branches we cut away, the sun was setting and shining directly on the hive (which warmed the wax enough to melt the connection to the fence), and the hive had a surprising amount of honey in it (making it quite heavy).
Ok, plan B: scoop up the bees and put them into a hive, also pray that the queen didn't get crushed to death. Here is how we put the pieces of comb into frames, you cut chunks of the hive to the right size and then tie them in with cotton string. Once in the hive for a few days, the bees will patch up the comb and attach it to the frame:

We managed to salvage about 5 frames of comb (if plan A had worked out, we were expecting to get 10+ frames). We did need to check through all the little bits of comb to make sure we didn't miss the queen. here is Art shaking some bees into their new home:

After we were done, we filled up the box with frames that had foundation on them and then put another medium on top. We left the cover askew so that the scent of the queen would attract the stray bees left on the lawn and fence:
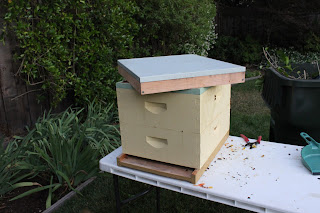
It was a really good sign that the bees at the top of the hive and around the entrance were "fanning". Fanning is when they stick their butts in the air and fan their wings. I've seen bees doing this when the hive is hot - then they are doing it for ventilation. However, in this case the bees are doing it to fan the scent of the queen out around the new home. This means that the bees think the queen is in residence inside the new yellow hive:

We made sure to remove as much of the scent from the fence location as possible. There were little nubs of wax on the branches, Art said these were "scent tabs". Essentially little bits of wax that smell like the queen to attract bees that got a little lost in the swarming process. We left the hive near the fence location so the bees would go to the new hive rather than cling right back to the fence. Here are the "scent tabs":

I'll check back in on these guys in a week or so to remove all that string and make sure they are liking their new home :) Luckily there were plenty of eggs in the comb we put in the hive, so if the queen was lost in the fall, they should be able to make a new one. Hopefully the fanning means we got her in there though.
Sunday, June 23, 2013
Lost and Found
So I lost half my Thistle hive to swarming, not to mention a very good and productive queen. However, I didn't lose them for long! I found them! They were hiding in this bush about 30 feet from the original hive! This is actually right where my neighbor noticed the high bee activity. Brandon is pointing out the swarm's hiding spot:

Oh? You don't see them? How about now?


I estimate there is about 1 deep super full of comb built onto the fence. This is no longer a swarm since the bees have started building comb. I guess my swarm left, found this fence and decided to stay! Lucky me! Now I'll just grab them and make that third hive I was talking about :)

Oh? You don't see them? How about now?

Still don't see the bees? Try again:

Here they are!

I estimate there is about 1 deep super full of comb built onto the fence. This is no longer a swarm since the bees have started building comb. I guess my swarm left, found this fence and decided to stay! Lucky me! Now I'll just grab them and make that third hive I was talking about :)
Swarm Confirmation and Supersedure
Well, I think I've got a confirmation that the Thistle hive swarmed. Earlier this week I was talking to our backyard neighbor, he had said there was extremely high bee activity happening on our property line around June 4th. It was only for a day, so I assume that about half of the Thistle hive took off with the queen. Usually a swarm will leave the hive and regroup within 50 feet of their hive, then they'll send out scouts to look for a permanent location. I assume my bees hung out around the fence and then moved on.
A new queen only takes about 16 days to hatch, since I saw queen cells around the end of May, I figured it was ok to take a peek inside of the Thistle hive to see if she had started laying eggs yet. If she hasn't it's no big deal, it's still early. A new queen hatches, then kills any other younger queens that didn't hatch (eliminating the competition). After that she goes on a mating flight where she mates with several drones, then she returns to the hive to start laying eggs. That whole process is probably not complete quite yet.
Inside of the Thistle hive, there were a lot of empty cells and a lot of capped brood. No larvae and no eggs. Worker bee larvae gets capped with wax around 9 days after a queen lays an egg, then hatches 21 days after the egg has been laid. That means that the queen must have been in the hive between June 2nd and June 14th, but then she left - so our neighbors account of a ton of bees swarming on the 4th lines up exactly with what is happening inside the hive. I actually didn't see any queen cells, but perhaps the bees have cleaned them up by now. I'll check for eggs in the next few weeks just to make sure everything is going well with the new queen.
Now to the Mint hive - there has been extremely low activity in front of the Mint hive. During the middle of the day, when there should be peak activity in front of the hive, there are only 2 or 3 bees coming in or out of the hive:

The Thisle hive, even after swarming, looks more like this (these pictures were both taken within minutes of each other):

So something definitely seems wrong with the Mint hive. When I opened up the hive, there were extremely few bees, and supersedure cells everywhere. Supersedure cells are cells used for growing queens. When a hive wants to swarm, they build swarm cells - also used for growing queens. The only difference between the two is that swarm cells are usually built along the bottom of the frame, the existing queen will take half the bees and leave, and a queen that hatches from a swarm cell will take over. Supersedure cells are built all over the frame and are used to replace a failing or non-existent queen, when the new queens hatch they will kill the old queen. The long cells are supersedure cells that have hatched (well, only one of them hatched, then that queen went around to all the un-hatched cells, opened them, and "took care" of the competition):

So it looks like either A) The Mint bees didn't like their queen and replaced her, or B) The Mint queen died and they replaced her. Apparently this is quite common with packages (Mint was a new package this spring). On the bright side, I saw one frame that had about 1/4 of the cells filled with eggs and 1/4 of the cells filled with larvae - so it would seem that there is currently a queen in residence.
Wax Moths
I was preparing for a hive inspection, so I went to go check on my drawn frames in the garage - they are covered with wax moths! The webbing you see below is from wax moths, there is even an adult wax mot in the picture:

Wax moths are generally kept in check when they are inside of the hive - the bees will recognize them as a pest and chase them away. When storing frames not on the hive, wax moths can move in quite easily.
I salvaged most of my frames, but a did clear out 3 or 4 that looked like the one above - there is just too much webbing. I put about 20 of the frames in the freezer, putting frames in the freezer kills the wax moth larvae so it won't be a continuing problem.
Monday, May 27, 2013
Honey Harvest
Today we did another honey harvest, with some brand new honey helpers! Special thanks to Shawn, Amanda, Laura and Eirik (and of course thanks to returning helper, Brandon, mandated to help because he is marrying the beekeeper).
We harvested 27 frames this time, split into two batches. The first batch was new spring honey (about 22 pounds collected). The second batch was honey that has been in the hive since the fall (I'm still waiting on the filtering, so no final weight). I tried to divide up this honey because the fall honey crystalizes so quickly. Brandon and I really want to get some nice clear spring honey to use as wedding favors, so that 22 pounds is going straight in to some adorable glass jars. The fall honey we'll either sell/gift/brew or use ourselves.
Here is the honey extraction team in action:


With the new extractor, we can spin the frames much faster. Since this is a radial extractor, there is less of a risk of destroying the comb by spinning too fast. In a tangential extractor, you risk the honey on the inside of the frame pushing through the middle of the frame - destroying the comb on it's way. However the extractor can get really wobbly when we spin faster, but luckily the legs have holes drilled in the bottom so that you can bolt it down. So some of the men folk ventured to the hardware store to find a solution:

They were pretty close to solving the problem - but the screws that they got didn't quite work out. We'll probably grab some bolts before we try to harvest again.
Queen Cups
When we were taking the frames of honey to harvest off of Thistle, we found two
frames of brood and A LOT of queen cups. None of them seemed to have any eggs in them, but that is probably because these frames were above the bee escape. One of them had some white waxy
looking substance in it, I think it may be royal jelly, though it looks
a lot more solid than I thought royal jelly would:

I suspect the bees are preparing to swarm - meaning the existing queen is preparing to leave with a large portion of the bees in the hive. They've run out of space and want to find a new home. The bees that remain in the hive would raise a new queen in one of these queen cups.
This would be the perfect time to split the hive. Splitting is essentially me swarming for the bees. Since Thistle feels like it is out of space, I would split it's resources in half and create two hives. Unfortunately I don't have the resources or time to perform a split right now. Though I have been preparing to split Thistle into a new yellow hive, I still don't have an extra bottom board or inner cover - so I have no where for a new hive to go. This means I'll probably end up losing my queen, which is too bad since she is obviously doing an amazing job since her hive is so strong.
Friday, May 24, 2013
Tall Tower
Today we put the bee escape on the Thistle hive so that we can harvest honey over the long weekend (the bee escape makes it so the bees can move downward, but not upward - so they'll empty out of the honey supers so we can harvest the honey). We can barely even call it the "Thistle" hive anymore though - I've already used my extra white box, cannibalized some supers from the Mint hive, and now I've even started using the boxes from an un-named third hive (we haven't named the yellow hive yet - perhaps sunflower, buttercup or sourgrass).
Here is the crazy multi-colored tower Thistle has become:

Here is the crazy multi-colored tower Thistle has become:

Sunday, March 17, 2013
First Spring Inspection
The weather has been getting up to 70 degrees during the day, so time to do the first spring inspection! There has been a lot of activity in front of the hive, so I was very excited to take a peek inside.
At a first glance, it looks like the bees have been doing a bit of spring cleaning. There was a lot of moldy/dusty looking pollen being thown out in front of the hive.
The hive still has 5 boxes on it, so I'll talk about them in the order that I took them apart. 5 will be the upper most box, 1 will be the lowest box.
Box 5 was about half filled with bees, there was mostly uncapped honey, but a little bit of capped honey.
Box 4 was similarly mostly uncapped honey, but there were eggs and larvae towards the bottom of some of the frames. So the queen may be hanging out up at the top to try to find space to lay eggs. I had left the queen excluder off of the hive for the winter so the bees could move freely wherever they wanted in order to keep warm and find food.
In between Box 4 and Box 3 there was a lot of burr comb containing larvae, unfortunately I had to break it open to move the boxes... sorry bees!

There was also one suspicious looking cell at the bottom of Box 4, it looked a bit like a queen cup since the opening was pointing downward instead of outward. The bees will build a lot of cells like this when they are preparing to swarm (leave the hive), so I decided to keep checking downward to make sure there weren't a lot of these:

Box 3 had a lot of capped brood spotted with eggs, pollen and larvae. Looks like the queen doesn't have a whole lot of space to continue laying eggs. Here's a frame that has capped brood, pollen, and then honey towards the outside:

I also saw a lot of drones while peaking around, there's one walking around in the middle of the above picture.
Box 2 was in a similar state to Box 3, lots of capped brood spotted with eggs, pollen and larvae. Down as far as box 2 it looked like there was really not a whole lot of space for the queen to lay new eggs. Each cell was already filled with something.
I was really curious to see what was in Box 1 since I had tried something odd last season. Last spring, the Thistle bees were spread out on the front of the hive a lot. One of the members of my bee guild had suggested adding an empty super on the bottom of the hive (instead of the top) so that the foraging bees had more space to land. It didn't really work as far as keeping the bees inside the hive more, and now that I've taken a look inside after winter, I'll definitely never do that again. Box 1 was mostly undrawn, and what was drawn was blackened or dusty like the bees hadn't been cleaning if very well.
I reorganized Box 2 and Box 1, putting half of the capped brood from Box 2 into Box 1. In both boxes, I put the brood into the center of the box, then filled the outsides with extracted honey frames. I took all of the undrawn comb out of Box 1 and I'm just storing it now. Hopefully this will coax the queen back down to the lower boxes to lay more eggs.
All in all, there was nothing too crazy going on inside, so it looks like the bees are doing good so far :)
In addition to peaking inside the hive, I did a little bit of cleaning on the outside. The copper roof had become pretty brown over the course of the winter, so I decided to clean it with some salt and lemons. Here's what it looked like before:
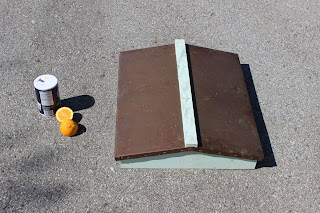
And here are the results, WOW!

Thursday, March 14, 2013
Granulated Honey
Well, I'm very glad that I didn't bottle that January honey - it granulated in the bucket. Here is what it looks like now, the little marks are where I tried to poke it with my finger and then later went at it unsuccessfully with a spatula:

I also have a few bottles of honey left, here is a picture that I took of the July vs. August honey today:

The August honey is now a creamy color and as solid as a rock (like the honey in the bucket)! Not to worry though, honey doesn't go bad, so this is still very tasty. In order to get it out of the little plastic bottle, you'll have to soak it in a bowl of hot water for a few hours - not too hot though, you should be able to hold your hand in the bowl without burning yourself. If the water is too hot you'll melt the plastic. DON'T MICROWAVE THOSE PLASTIC BOTTLES! You'll definitely melt the bottle. Once you've soaked the bottle, the honey should be soft enough to spoon out into a wide mouthed glass jar where you can store it and microwave it later. The honey is still very tasty in coffee, tea, and baked goods. You can eat it plain, but I much prefer the smooth texture to the granulated one.
Sunday, February 3, 2013
Winter Honey Harvest
So in an attempt to salvage something from the failed Mint hive, I decided I'd try to harvest their capped honey. It's always sooooooooo hot when we harvest honey, so I was thinking it would be a lot more comfortable to harvest when it was a bit cooler. Oh man, this turned out to be a terrible idea.
I thought it would hit 70 over the weekend, but it was only 60. The honey was way too cold to flow freely out of the comb, so we had a very tiny heater aimed at the extractor trying to coax it out. Here is an in progress shot with happy helper, Brandon (fiance's are mandated to help with all terrible ideas):

It took forever to get the honey out of the frames, and once we did, filtering was a several day process:

All in all, we extracted about twenty two pounds of honey - about 44 small (8oz) bottles, or 22 larger (16oz) bottles. Rather than bottling in this cold weather, we decided to wait until it was warmer. I also want to see how this honey holds up, a lot of the honey in the hive was crystalized, so I don't want to go through the work of bottling this if it is just going to solidify and be a pain to use.
Subscribe to:
Posts (Atom)