Saturday, December 29, 2012

July vs. August

I've been doing some honey tastings recently. I had one bottle of the July honey left, and I've got one of the August honey. Even thought they are from the same hives and harvested only a little over a month apart, they have very different tastes.


The July batch (on the left) is still very clear even though it was harvested earlier. The taste is very mild, you can't pick out any strong flavors.

The August batch (on the right) crystallized around November, it started out the same color and texture as the July batch, but has a much stronger taste. There have been a lot of guesses as to what flowers gave this batch its unique flavor, but I think we've decided that it's fennel. There are tons of fennel plants in the Los Altos area, and it does bloom in late July and August. This batch is the clear winner for taste.

Wednesday, December 12, 2012

Holiday Bazaar

My work had a Holiday Bazaar today - usually a lot of my coworkers sell their art; paintings, drawings, sculptures, pottery, etc. So I figured I would try my hand at selling honey. Mom had a lot of success selling to her quilting guilds, so I brought about 10 large (one pound) bottles of honey, roughly 30 small bottles of honey, 2 votives and two larger candles. I sold out completely within 30 minutes!

Here is the one picture I managed to snap before I got mobbed. I wasn't fully set up yet, so only a small portion of the honey was on the table. I also had two of my favorite honey pieces on the table for decoration (good thing too, because they were the only things left on the table!) Thanks to my friend, Kris, for the honey spoon and Evan for the honey pot :)


Thursday, November 29, 2012

Honey Label: Hometown Honey!

I figured I should have a proper label for the upcoming Holiday Bazaar at my work (where I plan to sell some honey). So we've finally come up with a name: Hometown Honey! Thanks to my friend, Emma (of Emma San Cartier Illustration) we have a beautiful new label too!


Wednesday, October 10, 2012

Recipe: Lemon Honey Macaroons

I gave a bottle of the August Harvest honey to my friend, Psy, and here is the recipe she came up with. These were soooo delicious!

Lemon Honey Macaroons

Photo Credit: Kendal Sager
Recipe Credit: Psy Delacy


Makes 30-50 cookies depending on shell size

Lemon Shells

Ingredients:
  • 4 egg whites, separated when cold, then aged, covered, for 24 hours.
  • 1/4 teaspoon cream of tartar
  • 1/4 cup superfine granulated sugar
  • 1 teaspoon vanilla extract (or for an even more lemony shell, 1/2 tsp
  • vanilla extract and 1/2 tsp lemon extract)
  • 2 cups powdered sugar
  • 1 cup almond meal
  • Yellow gel food coloring, if desired
  • Lemon zest, lemon sugar or fairy dust (optional)
Directions:
  1. For the egg whites: they separate better when cold, so separate them, cover lightly with saran wrap, and leave on the counter for at least 24 hours.
  2. Preheat the oven to 325F.  Line an aluminum or otherwise light colored baking sheet with silpat.
  3. Grind the almond meal in a food processor for about 10-15 seconds to break up any larger chunks. Sift together the almond meal and powdered sugar, and set aside.
  4. Whisk or beat the egg whites and cream of tartar on medium-high until soft peaks form.  Slowly add the granulated sugar, and continue to whisk on medium-high until stiff peaks start to form.  Add the extract and food coloring, and then continue to beat until you have a glossy, stuff meringue.
  5. Fold in the powdered sugar/almond mixture carefully, as to not deflate the meringue.  Mix until just incorporated, and then mix gently until you notice that if you lift up the spatula and let the batter flow back into the bowl, the "ribbons" that form disappear in about 10-18 seconds.
  6. Add the mixture into a pastry bag with a #11 or #12 type round tip. To pipe it onto the silpat, hold the bag over the silpat so that the nozzle is about a centimeter above the silpat, and squeeze so that the batter comes out of the pastry bag nozzle and spreads itself out until it's about the size of a quarter to a half dollar, depending on how big you want your macarons.  Space them about an inch apart on the silpat - they don't bake well if they are crowded.
  7. Once an entire sheet is piped, take the entire cookie sheet and whack it on the counter a few times to get any air bubbles out.
  8. Lightly dust the piped shells with lemon zest or sugar, if desired.
  9. Let the shells rest for about 15-30 minutes, depending on humidity. If you can, pipe the second batch as soon as the first goes into the oven, so that they will be ready when the first batch comes out.  Only cook one batch at a time, otherwise they won't cook well.
  10. Bake the cookies for 13-15 minutes, or until just barely golden on the bottom.
  11. Let them cool on the sheet for 5-10 minutes before moving them.  To get them off of the silpat, gently peel the silpat out from underneath them.  The bottoms should be flat, and they should peel off easily.
  12. If you did not opt for lemon zest or lemon sugar, once the shells cool they can be dusted with fairy dust using a small foodsafe paintbrush.  Edible fairy dust can be found at most kitchen or baking supply stores, and it's completely safe to eat.

Whipped Lemon Honey White Chocolate Ganache:

Ingredients:
  • 1 bag of white chocolate chips or baking chocolate (about 12 oz), plus
  • extra if needed
  • Juice from 1 lemon
  • 1/8th cup honey (or more, to taste)
  • 1/2 cup heavy cream
Directions:
  1. Juice the lemon and remove any seed pieces.  Set aside.
  2. Combine the white chocolate and honey in a heat safe bowl.
  3. Heat the heavy cream over medium heat, stirring often.  Once it's just about to boil, pour it over the chocolate chip honey mixture and whisk until the chocolate is melted.
  4. Add the lemon juice and stir until combined.  The mixture should be thick and syrupy - if it seems too thin, you can add more white chocolate to thicken it.  Be sure to taste it as well - if needed, add more honey or lemon juice.
  5. Refrigerate for a few hours until completely cool.  It should thicken considerably in this time.
  6. Whisk the mixture on high to developed the whipped white chocolate ganache.  Once it is light and fluffy, pipe it onto half of the macaroon shells using a pastry bag.
  7. Cover and refrigerate the complete macaroons overnight so that the flavors meld properly, and bring to room temperature prior to serving. If refrigerated they will last up to a week (if they don't all immediately get eaten).
 

Wednesday, September 19, 2012

School Talk

I recently visited a local preschool to talk about bee life cycles and how we get various products from bees. This was an awesome experience - the kids were actually really engaged. I was really surprised at some of the questions that they asked, they must have been briefed :) They were asking how bees communicated and what they do in the winter to keep warm.


I'm glad I brought so much of my equipment because that seemed to be their favorite part. They really liked squishing up beeswax, and of course they loved tasting the honey at the end.

Saturday, September 15, 2012

Recipe: Honey Whipped Cream

Mom loved the honey cook-off idea, so she whipped up a few recipes of her own. Here is our favorite so far:

Honey Whipped Cream

Photo Credit: Kendal Sager
Recipe Credit: Paula Sager


Ingredients:
  • 2 tbsp honey
  • 1 cup whipping cream
Directions:
  1. In a large bowl, whip cream until peaks form.
  2. Whip in honey (sugar is typically used instead). If you use a flavorful honey, the taste should come across nicely.
  3. Serve with fresh fruit (shown above in a puff pastry bowl)

Free standing comb

After the last honey harvest, I threw all of the honey supers back onto the hives. I wanted to pull them back off for winter to reduce the hive size, but when I went to check on the bees today, they were already refilling all of the comb. There were way too many bees to take away the supers, so I just left them there.

Another surprise when I peaked in, I had forgotten to replace the foundation on one of the frames, but the bees just started filling it right up with comb:


I'd like to do more of my frames this way next year, rather than starting the bees off with plastic foundation. This way I might be able to harvest some honey comb next year. I ended up pulling this frame out of the hive temporarily so that I could show it to the class that I am teaching next week. This will be a great way to show kids how bees naturally draw comb.

Sunday, September 9, 2012

Honey Cook-Off

A few friends and I decided to do a honey cook-off with some of my latest harvest. We did it Iron Chef style with the theme ingredient of HONEY!

Below are some of the dishes I came up with. If you find any amazing honey recipes, please comment with a link :)
  
Sweet and Salty Bruschetta

Photo Credit and Recipe Credit: Kendal Sager


Ingredients:
  • 2 tbsp honey
  • 1 baguette
  • goat cheese (firm is better, I used Drunken Goat Cheese)
  • 1 granny smith apple
  • 1 pack pancetta
  • 1/2 cup chopped walnuts
Directions:
  1. Thinly slice your baguette, it looks best when you slice on a diagonal (rather than cutting perpendicular to the length of the bread, cut at a 45 degree angle to increase the surface area)
  2. Lay out all of your bread slices on a baking sheet
  3. Place a small slice of cheese on each slice of bread.
  4. Slice up your apple into small flat slices (not wedges), place one on each slice of bread.
  5. Crumple up a slice of Pancetta and balance it on top of your bread/cheese/apple
  6. Balance some chopped walnuts on top.
  7. Put the baking sheet in the oven and set the oven to broil. Keep the pan under the broiler until you start to see the bread turn a nice golden brown color, this will happen in only a few minutes. Keep your eyes on the bread as it is cooking, there is a very small window of time between "perfect" and "everything is ruined and my kitchen is filled with smoke".
  8. Place a piece of bruschetta on a plate and drizzle honey on top (about 1 tsp, anything less and you barely taste the honey).

Crispy Honey Garlic Chicken

Photo Credit: Kendal Sager
Recipe Credit: Food.com recipe modified by Kendal Sager


Ingredients:

Honey Garlic Sauce:
  • 2 tablespoons olive oil
  • 3 garlic cloves, minced
  • 1 cup honey
  • 1/4 cup soy sauce
  • 1 teaspoon fresh ground black pepper
Flour Coating Mixture:
  • 2 cups flour
  • 2 tablespoons powdered ginger
  • 1 teaspoon cayenne pepper
  • salt
  • 1 tablespoon fresh ground black pepper 
The Rest:
  • 2 eggs, slightly beaten
  • 4 tablespoons cold water
  • 10 chicken legs
  • vegetable oil
Directions:
  1.  Put about 2 inches of vegetable oil into a large flat frying pan. Turn the heat on to medium-low. Don't overheat the oil, I usually run my hand under water and shake a few drops into the frying pan at this point. When the water starts to sizzle, the oil is the right temperature. If the water just sits still, it's too cold, if the water causes the oil to pop and spatter everywhere, it's too hot. A splatter screen is very useful for this.
  2. While the oil is heating up, mix together the 'coating mixture'; set aside. 
  3. In a seperate bowl, whisk together the slightly beaten eggs and cold water. 
  4. Wash and pat the chicken legs dry. 
  5. When the oil is up to temperature, dip the legs into the egg wash and then toss into the flour mixture to evenly coat. Place as many legs as you can into the pan. Let the legs cook for 3-5 minutes or until that side starts to brown, then turn 1/4 turn. Turn and cook until all sides are browned.
  6. While you're cooking the chicken legs, you can prepare the sauce: In a medium sauce pan, cook over medium heat the olive oil and garlic to slightly soften; do not let it brown. Add the honey, soya sauce and black pepper. Continue to cook over medium heat and simmer sauce for 5-10 minutes, watching carefully as it simmers because it can foam up and overflow. Remove from heat. You can also do this part in the microwave - but watch it carefully, you really only want to warm it up.
  7. When the legs are done cooking, place them on a plate and then liberally pour the sauce over them. I suggest serving this with a salty vegetable.

Mini Baklava

Photo Credit: Kendal Sager
Recipe Credit: Idea from Giada (Cooking Channel) recipe created by Kendal Sager
 

Ingredients:

The Paste:

  • 1/2 cup almonds
  • 1/2 cup walnuts
  • 2 tablespoons sugar
  • 1 1/2 teaspoons ground cinnamon
  • 1/4 teaspoon ground cloves
  • Pinch of salt
  • 2 tablespoons melted butter
  • 3 tablespoons honey
The Sauce:
  • 1/2 cup honey
  • 1 tablespoon lemon juice
The Rest:
  • About 1 stick of butter melted (you can use 1 stick minus the 2 tablespoons you needed for the paste)
  • 12 sheets phyllo dough (I usually find this frozen, defrost in the fridge for 24 hours)
  • 2 mini muffin tins (enough for 24 mini muffins)
 Directions:
  1. Preheat oven to 350.
  2. In a food processor or blender, combine all of the ingredients for the paste. Pulse until everything is blended, you can leave the nuts a little chunky for texture.
  3. Lay out a sheet of phyllo dough on a clean surface (a cutting board would be best) and brush it with melted butter. Layer another sheet on top of it and brush it with butter again. Do this until you have 6 sheets of phyllo dough stacked up. Cut the dough into 12 pieces (4 pieces by 3 pieces works well) and carefully push the square into a mini muffin well.
  4. Spoon about a tablespoon of the paste into the dough, then bring the corners of the dough into the middle and twist to seal the dessert. It doesn't need to be sealed tightly just bring the corners out of the way of the other mini baklava.
  5. Bake for 20 to 25 minutes or until golden brown.
  6. While the baklava is cooking, combine the sauce and heat it in the microwave for about 30 seconds, just enough to warm it up a little. Don't let it foam up.
  7. When you take the mini baklava out of the oven, let them cool for a few minutes then place them on serving plates. Liberally drizzle the honey lemon sauce over the baklava.

Tuesday, August 28, 2012

Second Honey Harvest

For our second honey harvest, we enlisted some happy helpers (Thanks Cliff, Emma, and Russel!) It was a good thing too, since we were harvesting 40 medium frames of honey on a weeknight. Here is happy helper, Emma, holding a full frame of honey:

Here are Russel and Emma decapping some frames:

I think this process may have convinced me to get an extractor of my own for next year, just so that I can have it when I need it. I wasn't really expecting to need to harvest a second time, so the extractor that I borrow from the Beekeepers' Guild of San Mateo County was booked every weekend. Overall we got about 7 gallons of honey, the process took pretty much all night, even with the 5 of us working on it. We also got a lot of wax from the cappings and burr comb:

Friday, August 17, 2012

Dancing Bees?

I was taking a look at the bees today, it was another very hot summer day so there were a lot of bees bearding around the front of the hive. There were a lot more around the entrance of the Mint hive. The bees on the front porch seemed to be fanning to cool the hive down, but I'm not sure what these bees on the side are doing (rapidly moving their front legs). Dancing perhaps?


Sunday, July 29, 2012

Name that Honey

We need a name for our honey! Do you have any ideas? Please comment on this post with name ideas (or email me - most people that read this blog are my friends and family - so you most likely have my email address already). Here is what the finished product looks like:


So far here are the two that I like the best:

Sweet Bees Honey
  • There are slight variations of this everywhere
  • Picture two or three round bees in a pea pod :) sweet bees!

Side Yard Honey
  • Because last year we started out with our bee yard in the side yard of Mom's house
If you send me an awesome original name that we choose, perhaps I will send you a honey prize! Or maybe you will be rewarded with the satisfaction of helping me out :) We'll see.

Sunday, July 22, 2012

Honey Harvest

Finally! Our first honey extraction! There is a brief video of the whole process at the bottom of this post.

The first step we took in preparing to harvest our honey was to get a honey extractor. Since Brandon and I are members of the Beekeepers' Guild of San Mateo, we were able to borrow an extractor and a few other tools from them.

Next, we had to get all of the bees out of the honey supers so that we could take the honey away. I got two triangle escape boards from 
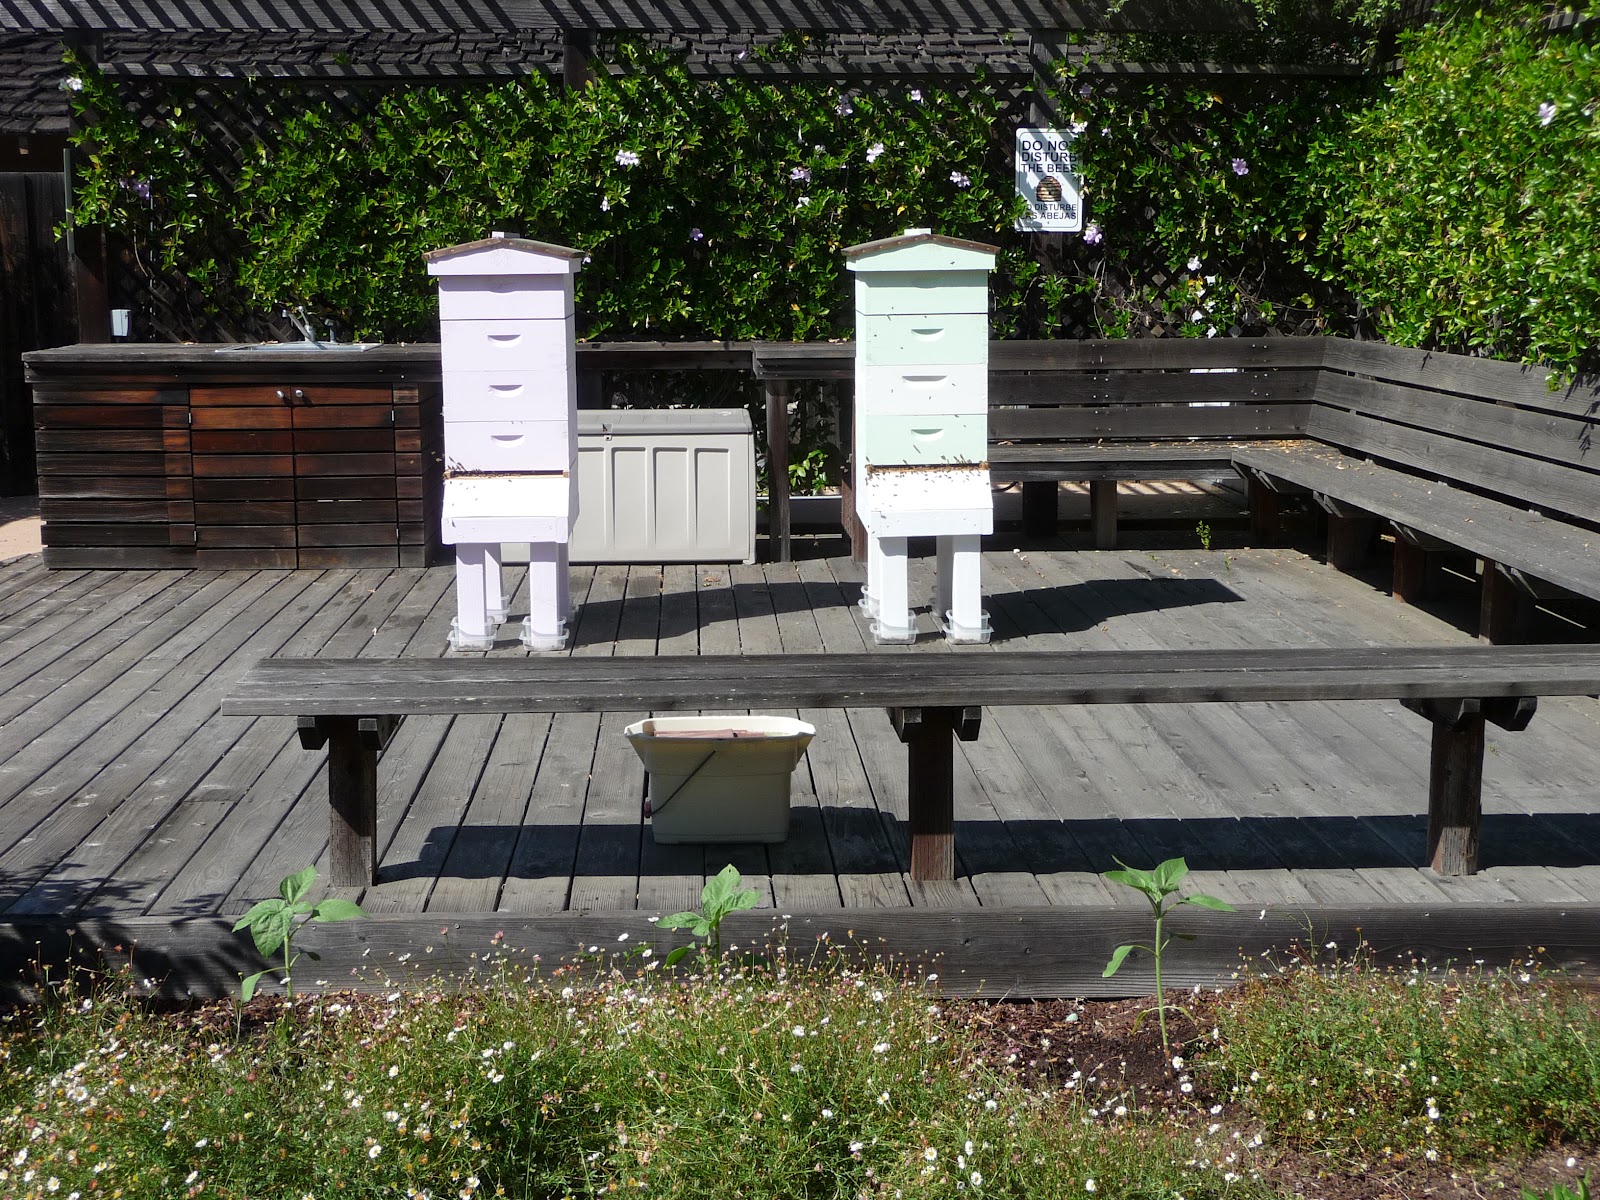
Brushy Mountain Bee Farm. The escape board goes between the brood boxes and the honey supers - the bees can move down into the brood boxes, but then they can't figure out how to get back up into the honey supers. On Friday afternoon, we put bee escapes on both hives. Here is a picture of the escape board on the Thistle hive (the bees go down through the hole and can't come back up):

We had two honey supers above the bee escapes on each hive (the un-painted wood that you see is the escape board):

On Saturday afternoon, we came back to the hives to take the honey away. We probably should have put the escape boards on 48 hours in advance, but we only managed to get them on 24 hours in advance. Despite that, there were very few bees in the top of the Thistle hive, maybe 20 bees on each frame - so we just brushed them off and took the honey. There were many more bees in the Mint hive - but they had a lot more uncapped honey. I was reading the Honey Handbook that Dad and Pauline got me for my birthday the night before, and it said not to take uncapped honey unless you had a way to measure the water content, otherwise the honey may ferment. I ended up leaving a lot of the honey on the hive because one or both sides had quite a lot of uncapped honey. Overall, out of the 40 frames that I was hoping to harvest, we were only able to harvest 9.

Now for the fun part! Extracting the honey from the frames. First we used a heated knife to scrape off the cappings (the bees seal the honey, so we open it up). We cut the cappings over a special bucket that has an upper tray and spigot in the bottom, the cappings stay in the top tray while the honey drips down below. When we're all done, we get a little extra honey out of the bucket. Then we put the frame into an extractor, which is a centrifuge to spin the honey out of the comb. Here is our whole operation, complete with Brandon spinning frames in the extractor:

The whole cutting and spinning process took a little getting used to. First of all, we probably destroyed a ton of comb just trying to uncap the frames - I think we were trying to cut too fast or the knife wasn't hot enough. Then, the frames we didn't destroy in the uncapping process, we finished off in the spinning process. The honey was so heavy that when we were spinning one side of the frames, the honey on the inside caused the frame to collapse towards the outside. We probably should have spun slowly on one side, then switched to the other side to keep the comb from collapsing.

After spinning the frames, we open the spigot at the bottom of the extractor. The honey drips down through a coarse filter and a fine filter (the fine filter is only 200 microns, so this process takes the whole night):

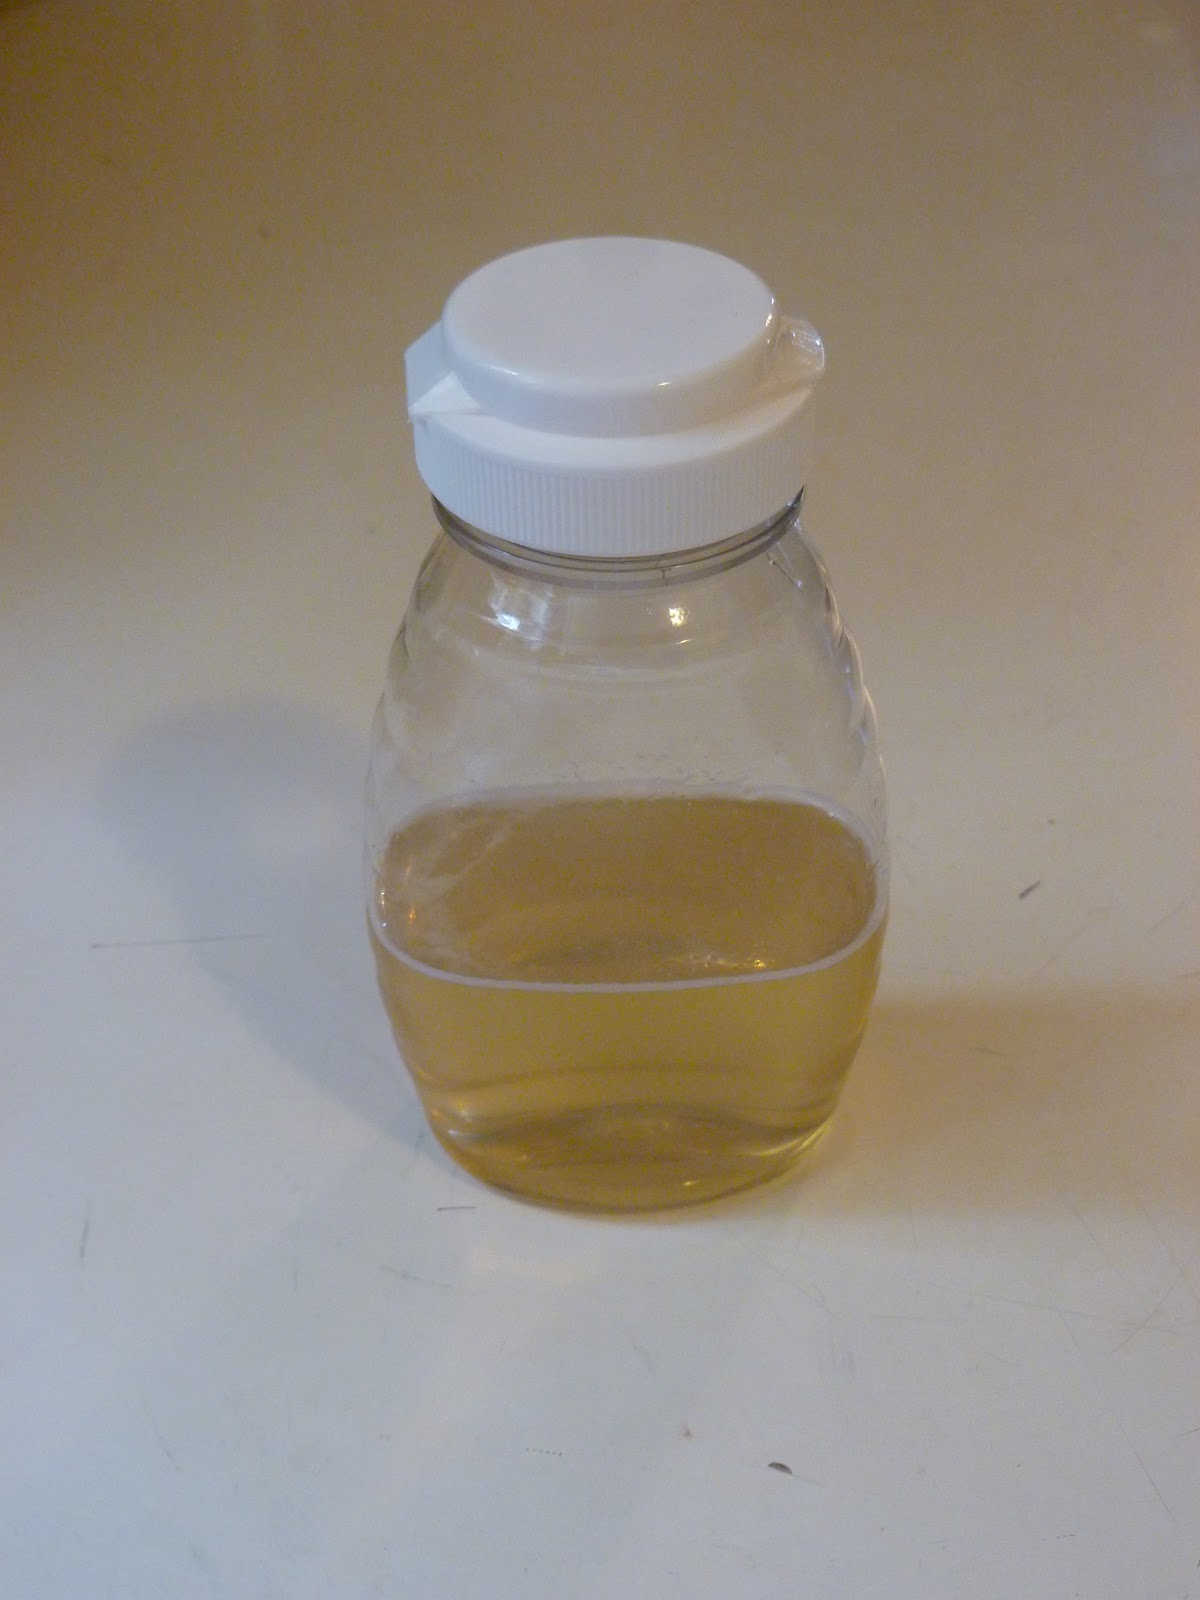
Once we've filtered out all the little wax particles, we ended up with about 1/3 of a 5 gallon bucket of nice clear honey. I had bought a few different sizes of honey bottle, here is me filling up a 3 pound bottle (I look kind of like a crazy person because I turned just long enough to snap a picture, I am trying not to spill honey everywhere - which did happen a few times throughout the bottling process):

Overall, we got 22 pounds of honey (two small bottles are not pictured here), which is pretty good for the number of frames we harvested. Since this is the first year, and these are brand new bees - this is about 1/4 of the amount of honey we expect to harvest next year. Here are all of the bottles we got this time (the small ones are 1/2 pound jars, the large ones are 3 pound jars):

Now we just need a name for our honey and a label :)

And here is the video, as promised:

Sunday, June 24, 2012

Queen Exile

I wanted to do one last thorough inspection before going out of town for the next few weekends. Thistle was looking pretty good, there was a lot of capped honey in the top super:

There were also a few crazy pieces, here is one where the bees had capped honey underneath, and another layer on top:

When I did Mint's inspection, they were not doing quite as well. When I started looking at the frames in the top super, there was a ton of brood! There should have been absolutely no brood because I was using a queen excluder - so that means that I accidentally trapped the queen in the top 25% of the hive that had mostly foundation without drawn comb on it. The bottom 75% was almost completely filled with honey, I saw a bit of what looked like drone brood, and there were a ton of drones wandering around the hive. Usually, when you trap the queen in the honey supers, the bees start to see her as weak because she is not producing enough brood - so they would either make a new queen, or a worker would start laying (worker bees can only lay drones). I only had the queen excluder on for 3 weeks, I didn't see any evidence that the bees had tried to replace the queen, so I just put the top box on in the middle and moved the bottom boxes filled with honey up to the top. Hopefully I didn't screw things up too badly...

Since both hives seemed to be pretty full - I put on another box, making the hives just about as tall as I was:

Sunday, June 17, 2012

Hot Bees

I did a double check today to make sure that the bees were making it up through the queen excluders, I only took a quick peek, but there seems to be a lot of activity up there. I didn't want to do a full inspection because it has been so hot recently (90+ degrees) so instead I just gave the bees some extra water (in their bucket) and planted 3 sunflowers for them (right in front of the bench):

There has also been a lot of activity in front of the hives lately, the bees are probably just trying to spend a little bit more time on the porch to cool down:

Sunday, May 20, 2012

Sneak Peek: Honey!

I went out to do a thorough hive inspection today. I have been a little concerned about the bees because they seem to bunch around the opening after inspections, so I was thinking that they were maybe too crowded in just two medium boxes. A bunch of the folks I know in the San Mateo Bee Guild attended a class where the instructor suggested putting a new box on the bottom instead of the top so that the returning foraging bees have more space to come inside. So I put one more brood box on each hive - I put Thistle's on the bottom and Mint's on the top just to see if it made any difference (looks like it didn't):


I also put a top entrance on Thistle so they have more places to enter the hive (you can see them clustering around a small hole at the top, that's their new entrance).

Mint also built a lot of burr comb up in their feeder, so I took that out. It was filled up with nectar and honey, so I decided to try to bottle it. Here is the smashed honey comb with honey in my filter, the honey is dripping down through the filter into a cup, leaving all the wax and gunk out:

And here is the final product! Honey! It is very light in color because it probably has very high water content. The bees put nectar into the comb and fan it to evaporate the water. When the honey has the right water content, the bees cap the honey comb. Most of the honey that I took was uncapped, so it probably has more water than it should, it is still delicious though (this is about 1/2 cup of honey):

Saturday, May 5, 2012

Visit from Padge and Heather

Today, Padge and Heather came to see the bees. They sat on the deck while I was doing the hive inspection, but they came up close to see a few things that I was pointing out. Here I am showing Mom and Heather some eggs, nectar, and pollen:

I also finally looked at the cardboard panel beneath my screened bottom boards this time, they were covered in cruft - it looked like mostly pollen that had fallen off of the bees, chewed out wax caps, and a bunch of squirming hive beetle larvae (gross). Padge, Mom and Heather came over to take a look:

I also put on my grease patties (that I had forgotten to put on in the last inspection). These are part crisco and part sugar sandwiched in between two sheets of wax paper. It helps guard against tracheal mites (I have no idea why):

And here is a really nice shot of a drone bee (boy bee) next to a worker bee (girl bee). The drone is on the right and has a larger body and huge eyes, the worker bee is on the left.

I was hoping that I'd be able to put a honey super on the Thistle hive, but they had only drawn out about 65% of their latest hive body. The Mint hive looked like it was only about 50% drawn. I did see a bunch of eggs in both hives, so I didn't bother looking in the bottom brood box..

For this inspection, I tried using a mixture of my new smoker fuels. I put in a few handfuls of cotton and a little handful of wood pellets. I didn't have to relight my smoker at all! This is the winning mixture for me, man I wish I knew about this last year.

Sunday, April 29, 2012

Return on Investment

FINALLY! A return on my investment! I made a candle and a little block of wax out of the burr comb that I scraped out of the Thistle hive a few weeks ago. I gave it to Mom as payment for her letting me fill her backyard with bees :)

And here are the "making of" pictures I took (over the course of several days). First, of course I have to start out with my safety equipment. I've got a baking soda (because you cannot use water on a wax fire, it will explode), a fire extinguisher (for when the baking soda fails), and my cell phone (to call 911 when the apartment is on fire):

Here are my candle making supplies. I've got a strainer and some cheese cloth for straining and purifying the wax, 3 votive molds, some candle mold release spray, and some wicks. Not pictured, I have two pitchers to melt the wax in. I purchased a starter kit from Michael's, it also came with a thermometer and very basic instructions on how not to burn your house down.

 Here I have one of Mom's old crock pots (set to about 250 degrees F) with a metal pitcher inside of it with my burr comb inside of the pitcher. I figured this was safest because wax is not supposed to get above 300 degrees F and you should not melt it over an open flame.

The burr comb contained lots of bee bits and pollen, so once it had melted down, I poured it through the cheese cloth/strainer into my alternate pitcher. This worked really well to take out the larger bee bits.

To get the smaller bits of pollen and honey out, I mixed the wax with water. The debris sinks to the bottom, the wax floats on top of the water. This worked really well to get a lot of the excess honey out, but not too well on the excess pollen. As you can see, once the wax cooled, it still had a lot of pollen specks in it:

I searched online for another method of straining out gunk, and one commenter suggested using old (but clean) pantyhose. So, I put a pair of pantyhose over my strainer and it worked like a charm!

The results were this clean slab of wax (with some pollen still around the edges because I wasn't using a completely clean pitcher... though I'm note really sure how to clean the pitchers... oh well, I'll worry about that later).

I melted down my clean wax again and strained it through pantyhose one more time into my molds. I had enough for one votive and one 1/2 ounce brick of wax. I am using the pencil to hold the wax up straight.
 

Now to figure out how to clean the wax off of everything...

Sunday, April 22, 2012

Feeder Failure

Last time I visited the bees, I put my Mann Lake feeder on the Thistle hive and the Brushy Mountain feeder on the Mint hive. I had the Mann Lake feeder on my hive last year and really liked it, I only bought the new one from Brushy Mountain because I needed another feeder and I was getting all of my other supplies from them. Here are my findings (result - I'm buying another Mann Lake Feeder):


Mann Lake Hive Top Feeder:
+ Comes with a super already around it so it stacks easily onto the hive
+ Has a large capacity (4 gallons)
+ The mesh in the middle is removable (if you ever need to clean it)
- There is a lot of open space in the middle of the feeder for the bees to create burr comb in.

Brushy Mountain Plastic Hive Top Feeder:
+ No space for the bees to create burr comb in
- Doesn't come with a super (adding one is supposed to create a better seal so bees don't come in the top and drown).
- Harder to pick up when there is still sugar syrup in the feeder (because the super isn't attached)
- The places where the bees access the sugar cannot be removed, they aren;t mesh so you can't see in.
- If the bees do manage to find their way into the reservoir (despite using a super to create a better seal) you end up with a sea of dead bees:

Saturday, April 14, 2012

Expansion

Wow! Thistle went nuts over the last 2 weeks and built comb everywhere! Their completely empty hive body (spare 9 wax sheets and 1 frame of drawn comb) was 70% drawn (meaning they had built comb on 7 of 10 frames) and was filled with honey, pollen, and brood. Additionally, Thistle build comb all the way up into their feeder, last year's bees NEVER did that, so I guess they were just looking for more space. Here is what the bottom of the feeder looked like, where all those bees and comb is SHOULD be completely empty:

 And as expected, Thistle built a bunch of burr comb where the queen cage had been (the queen cage causes a larger than usual gap so that the bees can build unusual comb). Here is what they did on this one of the middle frames:

I cleared out all of the burr comb because it was just a mess, here is all of the wax that I collected (in a gallon baggie). I think I'll try to melt it into some candles:

Unfortunately in taking the burr comb away, there were a few casualties. I broke open a few cells that had larve in them (as you can see on top of some of the middle frames). Fortunately most of the burr comb was pretty new, so it wasn't filled with very much, only a few larve and a bit of pollen and honey:

 Mint on the other hand was VERY good, but probably only because they were slower than Thistle and didn't outgrow the space I gave them. They had drawn about 60% of their hive body and were clustered around the one frame of drawn comb that Vicky gave me:

Mint didn't really make any burr comb, overall it was a much easier inspection. I didn't spend too much time peaking around Thistle because there was so much clean up to do, but for Mint, I got a chance to inspect the frames and I did see some eggs (meaning the queen is alive and well, or at least was in the last few days). Both the feeders were completely out of syrup when I checked on them, and Mint had a smaller feeder so they must have been out of food for longer than Thistle was - which probably explains why they were much less advanced than Thistle. I ended up giving Thistle another hive body to grow into, but left Mint with just their first one:

One new thing that I tried this year was actually buying some proper smoker fuel. Last year I tried burning misc things that I found in the back yard: twigs, leaves, paper bags. It was a huge pain in the butt to keep my smoker lit, I usually ended up relighting it 5 or 6 times throughout the inspection of one hive. I bought some quick start pellets, wood pellets, and cotton fluff to see if I would have better luck - this time I went with a starter pellet and cotton fluff. It made a world of difference! I only relit my smoker once throughout the inspection of 2 hives. I'll test out the wood pellets too next time, they are supposed to have a longer burn time: