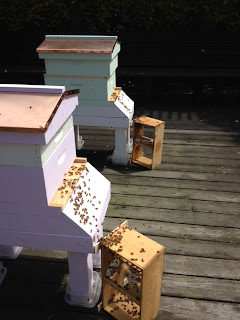
Vicky and Elizabeth installed my packages today and sent me this picture! The packages (that the bees came in) are in front of the hives because there are still a few stranglers:
My name is Kendal Sager, and I've been a backyard beekeeper since 2011. I keep a small number of beehives in my hometown of Los Altos, where I was born and raised. I have a passion for teaching and I love sharing my hobby through educational talks and events. This blog follows my adventures in beekeeping, check out my website for more: www.kendalsbees.com
Saturday, March 31, 2012
Thursday, March 29, 2012
Getting Ready for the Girls
The two packages of bees that I ordered from the Beekeepers Guild of San Mateo County are coming this weekend! Unfortunately I'll be in Seattle, but a friend of mine said she'd install my packages for me (thanks Vicky!). So I'm preparing my hives so they'll be ready for this weekend. I had 10 frames of wired wax leftover from last year that I am putting into the bottom brood boxes of the new hives. I marked them with Xs because I've heard that the wax only foundation doesn't go into honey extractors very well (also why I'm putting them in the bottom boxes, so they'll be used for brood, not honey).
Here is what a wired wax frame looks like, the foundation is only wax and it is held up by a few wires:
Here is what my other frames look like, they have duragilt foundation in them (which has a thin piece of plastic that is coated in wax, it also has a metal binding down the sides):
After putting all of the frames in the hive bodies, I put one medium hive body on each and placed them outside in their new location on the deck. The new location is much sunnier than last year (in the side yard where the bees really only got early morning sun).
I also got a new deck box to store my bee equipment in. I put my tools, some feeders, and some extra hive bodies in there:
Tuesday, March 13, 2012
Bee Building
Spent a few nights at mom's house assembling the hive bodies and frames. I chose some more interesting colors for the hives this year ("mint" and "thistle"). The frames are stacked to the side of the hives because the wood glue is still drying and I didn't want them to get stuck inside the hive bodies. I forgot the drill so I couldn't put together the hive stands, but I'll do that next time:
Sunday, March 11, 2012
Ramp Up
It's been a while! There is usually a lull in activity over the winter, but there has been an extra large lull for me since there were no bees. However, now I am starting to ramp back up for spring, starting with some brand new beequipment! This year I decided to go with Brushy Mountain Bee Farm for my hive equipment. A friend of mine in Seattle used their hive equipment, and I really liked how cute the hive tops were.
Brushy Mountain Bee Farm is actually based in North Carolina (I know, I know, I'm nuts. There are plenty of local suppliers). To to cut down shipping costs I bought most of my supplies un-assembled. Here are all of the parts that I need to assemble and paint in the next few weeks (this is 7 medium hive bodies and the 70 frames to go in them):
I got these items fully assembled:
- Copper Hive Top (much cuter than my previous telescoping top)
- Top Board with another entrance (not sure if I'll use the other entrance because I use hive top feeders - the bees wouldn't be able to enter from the top entrance if the feeder is on).
- Screened Bottom Board (this will help me monitor the mite population)
- Hive Top Feeder (I needed another one for my second hive. This is the Brushy Mountain version of my Mann Lake feeder - you need to place a hive body over it. At first glance I like my Mann Lake feeder better, but we'll see how well it works before I make a final judgment).
Subscribe to:
Posts (Atom)